
- A+
Kubernetes(K8s)是一个开源的容器编排系统,用于自动化部署、扩展和管理容器化应用程序。它由Google设计,支持自动化容器操作,提供容错、服务发现和负载均衡等功能,使得应用程序可以在不同的环境中稳定运行。K8s通过声明式配置和自动化管理,简化了容器化应用程序的运维工作。
Kubernetes(K8s)集群是由一组物理或虚拟机器(称为节点)组成的,这些节点被Kubernetes管理以运行容器化的应用程序。
集群组件:
控制平面(Master Node):
Kube-apiserver:集群的统一入口,处理所有REST操作;
etcd:一个高可用性的键值存储,用于存储集群的所有数据;
Kube-scheduler:负责调度Pod到合适的节点上。
Kube-controller-manager:运行控制器,如节点控制器、副本控制器等;
Cloud-controller-manager(可选):与云服务提供商的API交互;工作节点(Worker Nodes):
Kubelet:在节点上运行的主代理,确保容器运行在Pod中;
Kube-proxy:负责实现服务抽象,维护网络规则和转发;
容器运行时:如Docker、containerd等,负责运行容器。集群功能:
自动部署:根据定义的配置自动部署容器化应用程序;
扩展:根据需求自动或手动扩展应用程序的实例数量;
负载均衡:自动分配网络流量,确保部署的服务高可用;
自我修复:如果节点或容器失败,Kubernetes会重新调度Pod或重启容器;
服务发现和负载均衡:通过DNS名称或自己的IP地址自动发现服务;
存储编排:允许自动挂载选择的存储系统。集群操作:
部署应用程序:通过YAML文件定义应用程序的部署配置;
管理资源:定义和监控资源限制,如CPU和内存;
升级和维护:可以滚动升级应用程序,而不会中断服务;
Kubernetes集群的设计目标是提供一个平台,使得容器化应用程序的部署和运维更加简单、高效和可靠。
| 角色 | IP | 主机名 | 组件 |
| Master01 | 192.168.22.10 | k8s-master01 | kube-apiserver,kube-scheduler,kube-controller-manager,containerd,keepalived,haproxy |
| Master02 | 192.168.22.11 | k8s-master02 | kube-apiserver,kube-scheduler,kube-controller-manager,containerd,etcd,keepalived,haproxy |
| Node01 | 192.168.22.12 | k8s-node01 | kubelet,kube-proxy,containerd,etcd |
| Node02 | 192.168.22.13 | k8s-node02 | kubelet,kube-proxy,containerd,etcd |
所有节点初始化操作
关闭swap分区,提高Kubernetes集群性能、确保资源分配准确性和增强系统稳定性;因为内存不足时,系统会自动调用swap分区,将部分内存数据存放到磁盘中,性能会下降。
swapoff -a && sysctl -w vm.swappiness=0        //临时生效
sed -ri 's/.*swap.*/#&/' /etc/fstab        //永久生效
加载IPVS模块
yum -y install ipvsadm ipset conntrack libseccomp
vim /etc/modules-load.d/ipvs.conf
ip_vs
ip_vs_rr
ip_vs_wrr
ip_vs_sh
nf_conntrack
ip_tables
ip_set
xt_set
ipt_set
ipt_rpfilter
ipt_REJECT
ipip        //保存退出
systemctl restart systemd-modules-load.service
lsmod|grep -E "ip_vs|nf_conntrack"
修改内核参数
vim /etc/sysctl.d/k8s.conf
net.ipv4.ip_forward = 1
net.bridge.bridge-nf-call-iptables = 1
fs.may_detach_mounts = 1
vm.overcommit_memory=1
vm.panic_on_oom=0
fs.inotify.max_user_watches=89100
fs.file-max=52706963
fs.nr_open=52706963
net.netfilter.nf_conntrack_max=2310720
net.ipv4.tcp_keepalive_time = 600
net.ipv4.tcp_keepalive_probes = 3
net.ipv4.tcp_keepalive_intvl =15
net.ipv4.tcp_max_tw_buckets = 36000
net.ipv4.tcp_tw_reuse = 1
net.ipv4.tcp_max_orphans = 327680
net.ipv4.tcp_orphan_retries = 3
net.ipv4.tcp_syncookies = 1
net.ipv4.tcp_max_syn_backlog = 16384
net.ipv4.ip_conntrack_max = 65536
net.ipv4.tcp_max_syn_backlog = 16384
net.ipv4.tcp_timestamps = 0
net.core.somaxconn = 16384
net.ipv6.conf.all.disable_ipv6 = 0
net.ipv6.conf.default.disable_ipv6 = 0
net.ipv6.conf.lo.disable_ipv6 = 0
net.ipv6.conf.all.forwarding = 1        //保存退出
sysctl --system
参数说明:
net.ipv4.ip_forward = 1 # 开启IPv4数据包转发功能
net.bridge.bridge-nf-call-iptables = 1 # 开启网桥上的iptables规则处理
fs.may_detach_mounts = 1 # 允许卸载正在使用的文件系统
vm.overcommit_memory=1 # 允许过量使用内存,即允许分配所有物理内存
vm.panic_on_oom=0 # 内存不足时,不触发内核恐慌
fs.inotify.max_user_watches=89100 # 增加用户可以监视的文件数量
fs.file-max=52706963 # 系统全局文件描述符的最大数目
fs.nr_open=52706963 # 单个进程可以打开的最大文件数
net.netfilter.nf_conntrack_max=2310720 # 系统全局连接跟踪表的最大条目数
net.ipv4.tcp_keepalive_time = 600 # TCP连接的保活时间
net.ipv4.tcp_keepalive_probes = 3 # TCP保活探测的最大次数
net.ipv4.tcp_keepalive_intvl = 15 # TCP保活探测的间隔时间
net.ipv4.tcp_max_tw_buckets = 36000 # 系统同时保持的最大TIME_WAIT套接字数量
net.ipv4.tcp_tw_reuse = 1 # 允许重用TIME_WAIT状态的套接字
net.ipv4.tcp_max_orphans = 327680 # 系统可以处理的最大孤儿套接字数量
net.ipv4.tcp_orphan_retries = 3 # 在尝试删除孤儿套接字之前,进行重试的次数
net.ipv4.tcp_syncookies = 1 # 开启SYN Cookies,防止SYN洪水攻击
net.ipv4.tcp_max_syn_backlog = 16384 #SYN队列的最大长度
net.ipv4.ip_conntrack_max = 65536 # 系统全局IP连接跟踪表的最大条目数
net.ipv4.tcp_max_syn_backlog = 16384 # 重复设置,与上面相同
net.ipv4.tcp_timestamps = 0 # 关闭TCP时间戳
net.core.somaxconn = 16384 # 定义了系统中每一个端口最大的监听队列的长度
net.ipv6.conf.all.disable_ipv6 = 0 # 开启所有网络接口的IPv6功能
net.ipv6.conf.default.disable_ipv6 = 0 # 开启默认网络接口的IPv6功能
net.ipv6.conf.lo.disable_ipv6 = 0 # 开启回环接口的IPv6功能
net.ipv6.conf.all.forwarding = 1 # 开启IPv6数据包转发功能
配置ulimit
ulimit -SHn 65535        //临时修改
vim /etc/security/limits.conf        //永久生效
*           soft   nofile       655360
*           hard   nofile       131072
*           soft   nproc        655350
*           hard   nproc        655350
*           soft   memlock      unlimited
*           hard   memlock      unlimited        //保存退出
ulimit -a
升级内核至4.18版本以上
mkdir -p /root/tools/kernel && cd $_
wget https://mirrors.coreix.net/elrepo-archive-archive/kernel/el7/x86_64/RPMS/kernel-lt-5.4.278-1.el7.elrepo.x86_64.rpm
wget https://mirrors.coreix.net/elrepo-archive-archive/kernel/el7/x86_64/RPMS/kernel-lt-devel-5.4.278-1.el7.elrepo.x86_64.rpm
wget https://mirrors.coreix.net/elrepo-archive-archive/kernel/el7/x86_64/RPMS/kernel-lt-tools-5.4.278-1.el7.elrepo.x86_64.rpm
wget https://mirrors.coreix.net/elrepo-archive-archive/kernel/el7/x86_64/RPMS/kernel-lt-tools-libs-5.4.278-1.el7.elrepo.x86_64.rpm
yum -y remove kernel-tools-libs-3.10.0 kernel-tools-3.10.0        //移除原有内核
yum -y localinstall *.rpm
grubby --info=ALL        //查看所有已安装内核信息
grubby --info=ALL|grep ^kernel        //只查看已经安装内核版本
grubby --info /boot/vmlinuz-5.4.278-1.el7.elrepo.x86_64        //查看指定内核版本信息
grubby --set-default /boot/vmlinuz-5.4.278-1.el7.elrepo.x86_64        //设置默认内核
grubby --default-kernel        //查看默认内核
reboot        //重启
uname -a        //显示系统详细信息
所有节点配置hosts解析
vim /etc/hosts
192.168.22.10 k8s-master01
192.168.22.11 k8s-master02
192.168.22.12 k8s-node01
192.168.22.12 k8s-node02 //保存退出所有节点安装Containerd作为容器Runtime
Containerd是一个轻量级、高性能的容器运行时管理工具,由Docker公司开发并捐赠给CNCF。它专注于容器生命周期管理,支持OCI标准,具有可插拔架构,能够通过插件扩展功能。Containerd适用于多种容器编排系统,特别是与Kubernetes兼容,提供包括创建、启动、监控和销毁容器在内的全面容器管理能力。它的设计目标是嵌入到更大的系统中,作为容器编排的底层支撑。
下载解压cri-containerd-cni
wget https://github.com/containerd/containerd/releases/download/v1.7.18/cri-containerd-cni-1.7.18-linux-amd64.tar.gz
tar -xvf cri-containerd-cni-*-linux-amd64.tar.gz -C /
配置Containerd所需的模块
vim /etc/modules-load.d/containerd.conf
overlay
br_netfilter        //保存退出
systemctl restart systemd-modules-load.service
参数解释:
overlay: 覆盖网络,在不同主机上的容器间建立通信的网络技术;
brnetfilter: Linux内核模块,为桥接网络提供网络过滤功能,用于实现容器网络的安全策略。
配置Containerd所需的内核
vim /etc/sysctl.d/99-kubernetes-cri.conf
net.bridge.bridge-nf-call-iptables  = 1
net.ipv4.ip_forward                 = 1
net.bridge.bridge-nf-call-ip6tables = 1        //保存退出
sysctl --system
参数解释:
net.bridge.bridge-nf-call-iptables 1:开启桥接网络对iptables规则的支持;
net.ipv4.ipforward 1:开启IPv4数据包转发功能;
net.bridge.bridge-nf-call-ip6tables 1:开启桥接网络对ip6tables规则的支持。
创建Containerd配置文件
mkdir -p /etc/containerd
containerd config default|tee /etc/containerd/config.toml
sed -i 's/SystemdCgroup = false/SystemdCgroup = true/g' /etc/containerd/config.toml
vim /etc/containerd/config.toml
sandbox_image = "harbor.xxx.com/pause:3.8"        //在67行,修改为自己的私有仓库,保存退出
修改registry为国内镜像
sed -i 's#config_path = ""#config_path = "/etc/containerd/certs.d"#g' /etc/containerd/config.toml
mkdir -p /etc/containerd/certs.d/docker.io
vim /etc/containerd/certs.d/docker.io/hosts.toml
server = "https://docker.io"
[host."http://harbor.xxx.com"]        //自己的私有仓库
  capabilities = ["pull", "resolve"]
[host."https://m.daocloud.io"]
  capabilities = ["pull", "resolve"]
[host."https://docker.m.daocloud.io"]
  capabilities = ["pull", "resolve"]        //保存退出
启动并设置为开机启动
systemctl daemon-reload
systemctl enable --now containerd.service
Master01和Master02准备证书生成工具cfssl和kubernetes相关命令
创建Kubernetes和Etcd相关目录
mkdir -pv /opt/kubernetes/{pki,bin,cfg,logs}
mkdir -pv /opt/etcd/{ssl,bin,cfg}
下载证书生成工具cfssl
wget -O /usr/local/bin/cfssl  "https://github.com/cloudflare/cfssl/releases/download/v1.6.5/cfssl_1.6.5_linux_amd64"
wget -O /usr/local/bin/cfssljson  "https://github.com/cloudflare/cfssl/releases/download/v1.6.5/cfssljson_1.6.5_linux_amd64"
chmod +x /usr/local/bin/cfssl /usr/local/bin/cfssljson
下载kubernetes-server-linux-amd64.tar.gz准备kubernetes相关命令
wget https://dl.k8s.io/v1.30.9/kubernetes-server-linux-amd64.tar.gz
tar -xvf kubernetes-server-linux-amd64.tar.gz --strip-components=3 -C  /opt/kubernetes/bin kubernetes/server/bin/kube{let,ctl,-apiserver,-controller-manager,-scheduler,-proxy}        //只提取特定的文件
ln -s /opt/kubernetes/bin/kubectl /usr/local/bin/kubectl
配置kubectl命令自动补齐
kubectl completion bash > ~/.kubectl-completion
source ~/.kubectl-completion
Etcd集群搭建
etcd是一个开源的分布式键值存储系统,主要特点包括使用Raft算法保证数据一致性、支持数据持久化和高可用性。它通过简单的键值对模型和HTTP接口提供易用的操作,具备watch机制和租约机制,适用于服务发现、配置共享、分布式锁和集群管理等场景。etcd在分布式系统中扮演着配置中心和服务协调的重要角色,是构建现代分布式架构的关键组件之一。
Master02节点下载etcd安装包并解压
wget https://github.com/etcd-io/etcd/releases/download/v3.5.13/etcd-v3.5.13-linux-amd64.tar.gz
tar xvf etcd-v3.5.13-linux-amd64.tar.gz
mv etcd-v3.5.13-linux-amd64/{etcd,etcdctl} /opt/etcd/bin/
Master02生成etcd证书
创建自签CA证书
vim /opt/etcd/ssl/etcd-ca-config.json
{
  "signing": {
    "default": {
      "expiry": "876000h"
    },
    "profiles": {
      "etcd": {
         "expiry": "876000h",
         "usages": [
            "signing",
            "key encipherment",
            "server auth",
            "client auth"
         ]
      }
    }
  }
}
创建证书申请文件
vim /opt/etcd/ssl/etcd-ca-csr.json
{
  "CN": "etcd",
  "key": {
    "algo": "rsa",
    "size": 2048
  },
  "names": [
    {
      "C": "CN",
      "ST": "Beijing",
      "L": "Beijing",
      "O": "etcd",
      "OU": "Etcd Security"
    }
  ],
  "ca": {
       "expiry": "876000h"
  }
}
创建证书签名请求文件
vim /opt/etcd/ssl/etcd-csr.json
{
  "CN": "etcd",
  "hosts": [
    "127.0.0.1",
    "192.168.22.11",
    "192.168.22.12",
    "192.168.22.13",
    "localhost",
    "k8s-master02",
    "k8s-node01",
    "k8s-node02"
  ],
  "key": {
    "algo": "rsa",
    "size": 2048
  },
  "names": [
    {
      "C": "CN",
      "ST": "Beijing",
      "L": "Beijing",
      "O": "etcd",
      "OU": "Operations"
    }
  ]
}
生成Etcd证书和私钥
cfssl gencert -initca etcd-ca-csr.json |cfssljson -bare etcd-ca
cfssl gencert -ca=etcd-ca.pem -ca-key=etcd-ca-key.pem -config=etcd-ca-config.json -profile=etcd etcd-csr.json |cfssljson -bare etcd
openssl x509 -noout -text -in etcd-ca.pem |grep Not        //使用openssl命令查看证书过期时间
[root@k8s-master01 ssl]# ls etcd*.pem
etcd-ca-key.pem  etcd-ca.pem  etcd-key.pem  etcd.pem
Master02节点创建etcd配置文件
vim /opt/etcd/cfg/etcd.config.yml
name: 'etcd-01'
data-dir: /opt/etcd/default.etcd
wal-dir: /opt/etcd/wal
snapshot-count: 5000
heartbeat-interval: 100
election-timeout: 1000
quota-backend-bytes: 0
listen-peer-urls: 'https://192.168.22.11:2380'
listen-client-urls: 'https://192.168.22.11:2379'
max-snapshots: 3
max-wals: 5
cors:
initial-advertise-peer-urls: 'https://192.168.22.11:2380'
advertise-client-urls: 'https://192.168.22.11:2379'
discovery:
discovery-fallback: 'proxy'
discovery-proxy:
discovery-srv:
initial-cluster: 'etcd-01=https://192.168.22.11:2380,etcd-02=https://192.168.22.12:2380,etcd-03=https://192.168.22.13:2380'
initial-cluster-token: 'etcd-cluster'
initial-cluster-state: 'new'
#initial-cluster-state: 'existing'
strict-reconfig-check: false
enable-v2: true
enable-pprof: true
proxy: 'off'
proxy-failure-wait: 5000
proxy-refresh-interval: 30000
proxy-dial-timeout: 1000
proxy-write-timeout: 5000
proxy-read-timeout: 0
client-transport-security:
  cert-file: '/opt/etcd/ssl/etcd.pem'
  key-file: '/opt/etcd/ssl/etcd-key.pem'
  client-cert-auth: true
  trusted-ca-file: '/opt/etcd/ssl/etcd-ca.pem'
  auto-tls: true
peer-transport-security:
  cert-file: '/opt/etcd/ssl/etcd.pem'
  key-file: '/opt/etcd/ssl/etcd-key.pem'
  peer-client-cert-auth: true
  trusted-ca-file: '/opt/etcd/ssl/etcd-ca.pem'
  auto-tls: true
debug: false
log-package-levels:
log-outputs: [default]
force-new-cluster: false        //保存退出
cd /opt/
tar zcvf etcd.tar.gz ./etcd/
scp etcd.tar.gz k8s-node01:/opt/
scp etcd.tar.gz k8s-node02:/opt/
参数说明:
name: 节点的名称,用于在集群中标识该节点。
data-dir: etcd存储数据的目录。
wal-dir: etcd预写日志(Write-Ahead Log)的存储目录,如果不设置,则默认与data-dir相同。
snapshot-count: 在多少次事务提交后执行快照,以0为值表示禁用自动快照。
heartbeat-interval: 节点之间心跳的间隔时间(单位:毫秒)。
election-timeout: 选举超时时间,即节点在失去心跳后多久开始选举新leader(单位:毫秒)。
quota-backend-bytes: 允许etcd存储的数据量大小限制,0表示无限制。
listen-peer-urls: 监听其他etcd节点通信的URL列表。
listen-client-urls: 监听客户端请求的URL列表。
max-snapshots: 保留的最大快照文件数量。
max-wals: 保留的最大预写日志文件数量。
cors: 跨源资源共享(CORS)的配置,用于支持跨域请求。
initial-advertise-peer-urls: 告知集群其他节点自己的通信URL。
advertise-client-urls: 告知集群其他节点自己的客户端URL。
discovery: 集群发现服务的配置。
discovery-fallback: 当发现服务失败时的回退方案。
discovery-proxy: 用于发现服务的HTTP代理。
discovery-srv: 用于SRV记录的发现服务域名。
initial-cluster: 集群初始化的节点列表及其通信URL。
initial-cluster-token: 集群的ID,用于区分不同的集群。
initial-cluster-state: 集群的初始状态,可以是’new’或’existing’。
strict-reconfig-check: 是否在成员变更时进行严格的检查。
enable-v2: 是否启用V2版本的API。
enable-pprof: 是否启用性能分析。
proxy: etcd代理模式,'off’表示关闭。
proxy-failure-wait: 代理失败重试等待时间(单位:毫秒)。
proxy-refresh-interval: 代理刷新间隔时间(单位:毫秒)。
proxy-dial-timeout: 代理拨号超时时间(单位:毫秒)。
proxy-write-timeout: 代理写操作超时时间(单位:毫秒)。
proxy-read-timeout: 代理读操作超时时间(单位:毫秒)。
client-transport-security: 客户端传输安全相关的配置,包括证书和密钥文件路径。
cert-file: 客户端证书文件路径。
key-file: 客户端私钥文件路径。
client-cert-auth: 是否需要客户端证书认证。
trusted-ca-file: 受信任的CA证书文件路径。
auto-tls: 是否自动生成客户端证书。
peer-transport-security: 节点间传输安全相关的配置,包括证书和密钥文件路径。
cert-file: 节点证书文件路径。
key-file: 节点私钥文件路径。
peer-client-cert-auth: 是否需要节点间客户端证书认证。
trusted-ca-file: 受信任的CA证书文件路径。
auto-tls: 是否自动生成节点间证书。
debug: 是否启用调试模式。
log-package-levels: 日志包的级别。
log-outputs: 日志输出的目标。
force-new-cluster: 是否强制创建新集群,通常用于灾难恢复。
Node01节点修改etcd配置文件
tar xvf /opt/etcd.tar.gz -C /opt/
vim /opt/etcd/cfg/etcd.config.yml
name: 'etcd-02'
listen-peer-urls: 'https://192.168.22.12:2380'
listen-client-urls: 'https://192.168.22.12:2379'
initial-advertise-peer-urls: 'https://192.168.22.12:2380'
advertise-client-urls: 'https://192.168.22.12:2379'
Node02节点修改etcd配置文件
tar xvf /opt/etcd.tar.gz -C /opt/
vim /opt/etcd/cfg/etcd.config.yml
name: 'etcd-03'
listen-peer-urls: 'https://192.168.22.13:2380'
listen-client-urls: 'https://192.168.22.13:2379'
initial-advertise-peer-urls: 'https://192.168.22.13:2380'
advertise-client-urls: 'https://192.168.22.13:2379'
Master02节点、Node01节点和Node02节点配置systemdsystemd管理etcd集群
vim /usr/lib/systemd/system/etcd.service
[Unit]
Description=Etcd Service
Documentation=https://coreos.com/etcd/docs/latest/
After=network.target

[Service]
Type=notify
ExecStart=/opt/etcd/bin/etcd --config-file=/opt/etcd/cfg/etcd.config.yml
Restart=on-failure
RestartSec=10
LimitNOFILE=65536

[Install]
WantedBy=multi-user.target        //保存退出
systemctl daemon-load
systemctl enable --now etcd.service
Master012节点验证集群状态
/opt/etcd/bin/etcdctl --cacert=/opt/etcd/ssl/etcd-ca.pem --cert=/opt/etcd/ssl/etcd.pem --key=/opt/etcd/ssl/etcd-key.pem --endpoints=https://192.168.22.11:2379,https://192.168.22.12:2379,https://192.168.22.13:2379 endpoint health --write-out=table //验证它们的运行状态,以表格形式输出结果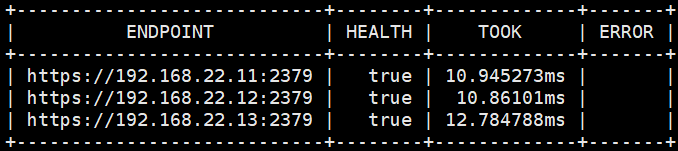
/opt/etcd/bin/etcdctl --cacert=/opt/etcd/ssl/etcd-ca.pem --cert=/opt/etcd/ssl/etcd.pem --key=/opt/etcd/ssl/etcd-key.pem --endpoints=https://192.168.22.11:2379,https://192.168.22.12:2379,https://192.168.22.13:2379 member list --write-out=table //列出etcd集群中所有成员的信息,以表格的格式显示
/opt/etcd/bin/etcdctl --cacert=/opt/etcd/ssl/etcd-ca.pem --cert=/opt/etcd/ssl/etcd.pem --key=/opt/etcd/ssl/etcd-key.pem --endpoints=https://192.168.22.11:2379,https://192.168.22.12:2379,https://192.168.22.13:2379 endpoint status --write-out=table //检查etcd集群中各个节点的状态,以表格的格式显示结果
第二章部署keepalived和haproxy实现高可用和负载均衡。


2025年3月21日 21:09 沙发
1