
- A+
Zabbix 是一款开源的企业级监控解决方案,能够监控网络中的各种设备、系统、应用程序和服务的状态。
Zabbix 主要组件:
Zabbix Server:核心组件,处理Zabbix Agent数据,执行监控任务,发送报警,并存储数据;
Zabbix Agent:安装在监控主机上,收集系统和应用数据,传输至Zabbix Server;
Zabbix Proxy:分布式监控中的可选组件,收集远程数据,转发至Zabbix Server,降低负载;
Web界面,用于配置监控设置,查看监控数据和报表,管理Zabbix。Zabbix 的主要特点包括:
自动化监控:能够自动发现网络设备和服务,并应用预定义的监控模板;
灵活的告警机制:可以根据监控项的值触发告警,并通过多种方式(如邮件、短信、微信等)发送通知;
丰富的可视化:提供图表、屏幕和幻灯片等多种方式来展示监控数据;
数据存储:支持多种数据库系统来存储监控数据,如MySQL、PostgreSQL等;
扩展性:可以通过编写自定义脚本、集成第三方工具或使用API来扩展Zabbix的功能。Zabbix 适用于各种规模的环境,从几台服务器的小型网络到拥有成千上万台设备的大型企业网络。它的设计目标是提供一个可扩展、可靠且功能强大的监控平台,以帮助IT运维团队确保系统的稳定性和性能。
安装 MySQL
添加MariaDB的Yum仓库
cat > /etc/yum.repos.d/MariaDB.repo << EOF
# http://downloads.mariadb.org/mariadb/repositories/
[mariadb]
name = MariaDB
baseurl = http://yum.mariadb.org/10.5/centos7-amd64
gpgkey=https://yum.mariadb.org/RPM-GPG-KEY-MariaDB
gpgcheck=1
EOF
安装MariaDB
yum -y install MariaDB-server MariaDB-client
systemctl start mariadb.service
systemctl enable mariadb.service
初始化 MySQL 安全设置
mysql_secure_installationY=是,n=否
NOTE: RUNNING ALL PARTS OF THIS SCRIPT IS RECOMMENDED FOR ALL MariaDB
SERVERS IN PRODUCTION USE! PLEASE READ EACH STEP CAREFULLY!In order to log into MariaDB to secure it, we'll need the current
password for the root user. If you've just installed MariaDB, and
haven't set the root password yet, you should just press enter here.Enter current password for root (enter for none): # 输入root的当前密码(如果没有,直接回车)
OK, successfully used password, moving on…Setting the root password or using the unix_socket ensures that nobody
can log into the MariaDB root user without the proper authorisation.You already have your root account protected, so you can safely answer 'n'.
Switch to unix_socket authentication [Y/n] Y # 切换到使用Unix套接字
Enabled successfully!
Reloading privilege tables..
… Success!You already have your root account protected, so you can safely answer 'n'.
Change the root password? [Y/n] Y # 是否更改root密码
New password: # 新的root密码
Re-enter new password: #重新输入root密码
Password updated successfully!
Reloading privilege tables..
… Success!By default, a MariaDB installation has an anonymous user, allowing anyone
to log into MariaDB without having to have a user account created for
them. This is intended only for testing, and to make the installation
go a bit smoother. You should remove them before moving into a
production environment.Remove anonymous users? [Y/n] Y # 移除匿名用户
… Success!Normally, root should only be allowed to connect from 'localhost'. This
ensures that someone cannot guess at the root password from the network.Disallow root login remotely? [Y/n] Y # 禁止root用户远程登录
… Success!By default, MariaDB comes with a database named 'test' that anyone can
access. This is also intended only for testing, and should be removed
before moving into a production environment.Remove test database and access to it? [Y/n] Y # 删除测试数据库
- Dropping test database…
… Success!- Removing privileges on test database…
… Success!Reloading the privilege tables will ensure that all changes made so far
will take effect immediately.Reload privilege tables now? [Y/n] Y # 重新加载权限表
… Success!Cleaning up…
All done! If you've completed all of the above steps, your MariaDB
installation should now be secure.Thanks for using MariaDB!
登录 MySQL 并创建 Zabbix 数据库和用户
mysql -u root -p
CREATE DATABASE zabbix character set utf8 collate utf8_bin;
CREATE USER 'zabbix'@'localhost' IDENTIFIED BY 'xxx.com';
GRANT ALL PRIVILEGES ON zabbix.* TO 'zabbix'@'localhost';
FLUSH PRIVILEGES;
EXIT;
安装Nginx
安装Nginx依赖
yum -y install pcre-devel openssl-devel下载Nginx
wget http://nginx.org/download/nginx-1.26.2.tar.gz配置编译Nginx
tar xvf nginx-1.26.2.tar.gz
cd nginx-1.26.2/
./configure --prefix=/usr/local/nginx-1.26.2 --user=nginx --group=nginx --with-http_ssl_module --with-http_v2_module --with-http_stub_status_module --with-stream
make && make install
ln -s /usr/local/nginx-1.26.2/ /usr/local/nginx修改Nginx配置文件mv /usr/local/nginx/conf/nginx.conf /usr/local/nginx/conf/nginx.conf-bak
vim /usr/local/nginx/conf/nginx.conf
user nginx nginx;
worker_processes auto;
worker_cpu_affinity auto;
pid /run/nginx.pid;
daemon on;
master_process on;
worker_rlimit_nofile 102400;
events {
use epoll;
worker_connections 102400;
}
http {
include mime.types;
default_type application/octet-stream;
log_format xxx '{"remote_addr": "$remote_addr",'
'"remote_user": "$remote_user",'
'"time_iso8601": "$time_iso8601",'
'"request": "$request",'
'"status": "$status",'
'"body_bytes_sent": "$body_bytes_sent",'
'"http_range": "$http_range",'
'"http_referer": "$http_referer",'
'"http_user_agent": "$http_user_agent",'
'"http_x_forwarded_for": "$http_x_forwarded_for",'
'"request_time": "$request_time",'
'"host": "$host",'
'"server_port": "$server_port",'
'"sent_http_location": "$sent_http_location",'
'"http_YID": "$http_YID",'
'"upstream_addr": "$upstream_addr",'
'"upstream_cache_status": "$upstream_cache_status"'
'}';
sendfile on;
tcp_nopush on;
server_tokens off;
server_names_hash_bucket_size 128;
client_header_buffer_size 32k;
large_client_header_buffers 4 32k;
keepalive_timeout 65 60;
tcp_nodelay on;
client_body_buffer_size 512k;
client_max_body_size 10M;
gzip on;
include vhosts/*.conf;
include status/*.conf;
include conf.d/*.conf;
}创建一个新的Nginx配置文件
mkdir -p /usr/local/nginx/conf/conf.d/
vim /usr/local/nginx/conf/conf.d/zabbix.conf
server {
    listen 80;
    server_name zabbix.xxx.com;
    access_log /data/logs/nginx/zabbix_xxx_com_access80.log xxx;
    error_log /data/logs/nginx/zabbix_xxx_com_error80.log;
    root /data/html/zabbix;
    location / {
        index index.php index.html index.htm;
    }
    location ~* \.php$ {
        fastcgi_index   index.php;
        fastcgi_pass    127.0.0.1:9000;
        include         fastcgi_params;
        fastcgi_param   SCRIPT_FILENAME    $document_root$fastcgi_script_name;
        fastcgi_param   SCRIPT_NAME        $fastcgi_script_name;
    }
}
创建用户并授权
useradd -s /sbin/nologin -M nginx
chown -R nginx:nginx /usr/local/nginx*
创建Nginx日志目录和网站存放目录
mkdir -p /data/logs/nginx/
mkdir -p /data/html/zabbix/
创建Nginx开机自启文件
vim /usr/lib/systemd/system/nginx.service
[Unit]
Description=The nginx HTTP and reverse proxy server
After=network-online.target remote-fs.target nss-lookup.target
Wants=network-online.target

[Service]
Type=forking
#PIDFile=/run/nginx.pid
# Nginx will fail to start if /run/nginx.pid already exists but has the wrong
# SELinux context. This might happen when running `nginx -t` from the cmdline.
# https://bugzilla.redhat.com/show_bug.cgi?id=1268621
ExecStartPre=/usr/bin/rm -f /run/nginx.pid
ExecStartPre=/usr/local/nginx/sbin/nginx -t
ExecStart=/usr/local/nginx/sbin/nginx
ExecReload=/usr/local/nginx/sbin/nginx -s reload
ExecStop=/usr/local/nginx/sbin/nginx -s quit
#KillSignal=SIGQUIT
TimeoutStopSec=5
KillMode=process
PrivateTmp=true

[Install]
WantedBy=multi-user.target
开机自启并启动Nginx
systemctl daemon-reload
systemctl enable --now nginx.service
添加软件仓库
yum -y install epel-release
yum -y install http://rpms.remirepo.net/enterprise/remi-release-7.rpm
安装PHP 7.4及相关扩展
yum -y install php74-php-gd php74-php-pdo php74-php-mbstring php74-php-cli php74-php-fpm php74-php-mysqlnd php74-php-bcmath php74-php-xml修改PHP-FPM 进程的系统用户和用户组
vim /etc/opt/remi/php74/php-fpm.d/www.conf
user = nginx
group = nginx
修改php.ini
vim /etc/opt/remi/php74/php.ini
expose_php = Off        //隐藏PHP版本,修改为Off
cgi.fix_pathinfo=0        //用于防止路径信息泄露,提高安全性
post_max_size = 16M        //设置通过POST请求可以上传的最大数据量为16MB
max_execution_time = 300        //设置PHP脚本的最大执行时间为5分钟
max_input_time = 300        //设置PHP处理输入数据的最大时间为5分钟
date.timezone = Asia/Shanghai        //设置PHP默认时区为亚洲/上海
开机自启并启动PHP
systemctl daemon-reload
systemctl enable --now php74-php-fpm.service
PHP测试页
echo "\<?php phpinfo(); ?>" > /data/html/zabbix/index.php浏览器访问
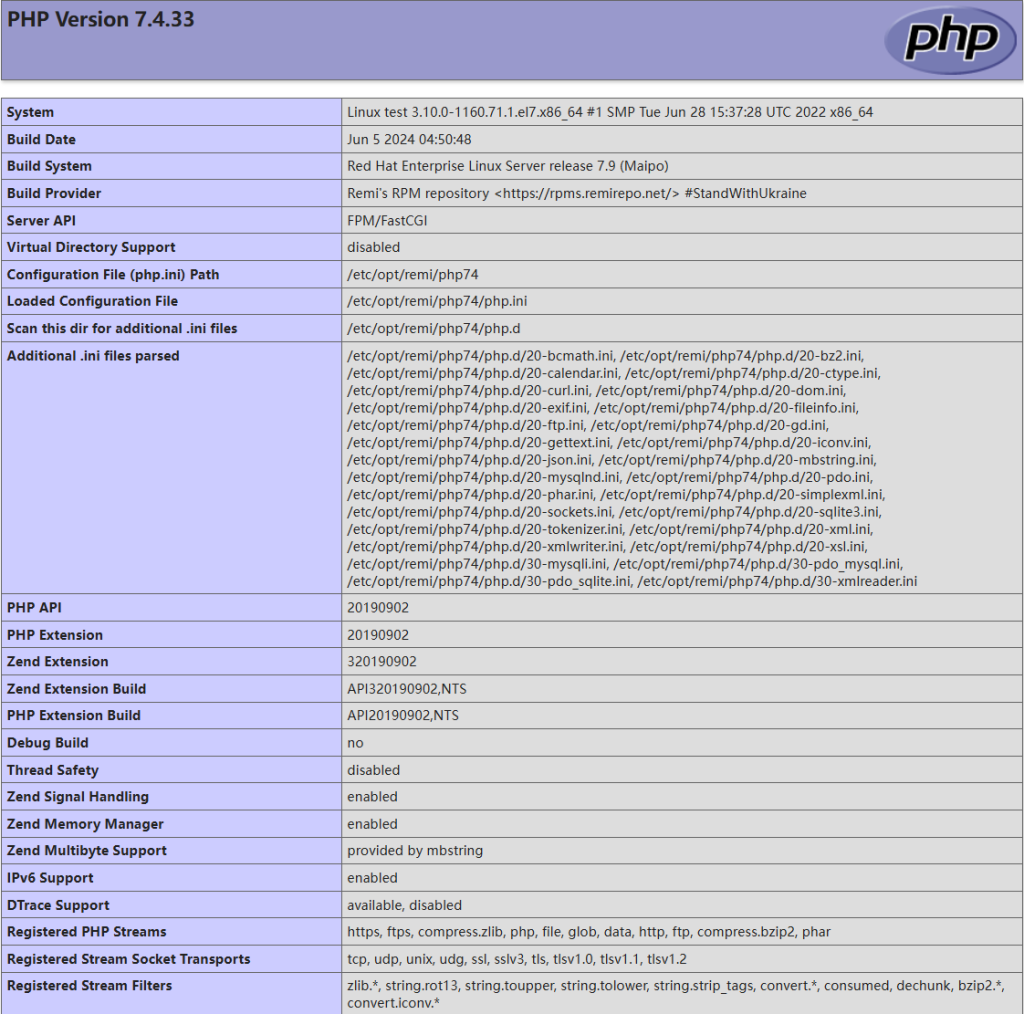
验证数据库连接
cat > /data/html/zabbix/test.php << "EOF"
<?php
    $conn=mysqli_connect('127.0.0.1','zabbix','xxx.com','zabbix',3306);
    if($conn) echo "连接成功!";
    else die("连接失败: " . mysqli_connect_error());
?>
EOF
curl http://localhost/test.php
连接成功!
安装Zabbix
安装Zabbix依赖
yum -y install mysql-devel net-snmp-devel OpenIPMI-devel libevent-devel libxml2-devel curl-devel go java-1.8.0-openjdk-devel wqy-microhei-fonts下载Zabbix包
wget https://cdn.zabbix.com/zabbix/sources/stable/6.0/zabbix-6.0.36.tar.gz配置编译Zabbix
tar xvf zabbix-6.0.36.tar.gz
cd zabbix-6.0.36/
./configure --prefix=/usr/local/zabbix-6.0.36 --enable-server --enable-agent --enable-agent2 --with-mysql --enable-ipv6 --with-net-snmp --with-libcurl --with-libxml2 --with-openipmi --enable-webservice --enable-java
make install
ln -s /usr/local/zabbix-6.0.36/ /usr/local/zabbix
修改Zabbix 服务器的配置文件
vim /usr/local/zabbix/etc/zabbix_server.conf
LogFile=/usr/local/zabbix/logs/zabbix_server.log        //设置Zabbix服务器日志文件的存储位置
PidFile=/usr/local/zabbix/logs/zabbix_server.pid        //指定存储Zabbix服务器进程ID的文件路径
DBHost=127.0.0.1        //定义Zabbix服务器连接的数据库主机地址
DBPassword=xxx.com        //设定连接数据库时使用的密码
DBPort=3306        //指定连接数据库所用的端口号
mkdir -p /usr/local/zabbix/logs
useradd -s /sbin/nologin -M zabbix
chown -R zabbix:zabbix /usr/local/zabbix*
导入 Zabbix 数据库结构
cd database/mysql/
mysql -uroot -p zabbix < schema.sql
mysql -uroot -p zabbix < images.sql
mysql -uroot -p zabbix < data.sql
mysql -uroot -p zabbix < double.sql
mysql -uroot -p zabbix < history_pk_prepare.sql
mysql -uroot -p -e "SHOW TABLES FROM zabbix;"
配置Zabbix开机自启动文件
vim /usr/lib/systemd/system/zabbix-server.service
[Unit]
Description=Zabbix Server
After=syslog.target
After=network.target

[Service]
Type=forking
User=zabbix
Group=zabbix
RuntimeDirectory=zabbix
RuntimeDirectoryMode=0755
PIDFile=/usr/local/zabbix/logs/zabbix_server.pid
ExecStart=/usr/local/zabbix/sbin/zabbix_server -c /usr/local/zabbix/etc/zabbix_server.conf
ExecStop=/bin/kill -SIGTERM $MAINPID
ExecReload=/bin/kill -HUP $MAINPID
Restart=on-failure
RestartSec=10s
TimeoutSec=0

[Install]
WantedBy=multi-user.target
启动Zabbix
systemctl daemon-reload
systemctl enable --now zabbix-server.service
安装部署zabbix-web前端界面
cd -
cp -a ui/* /data/html/zabbix/
cp: overwrite ‘/data/html/zabbix/index.php’? y
安装zabbix_agent2
修改zabbix_agent2配置文件
vim /usr/local/zabbix/etc/zabbix_agent2.conf
Server=127.0.0.1        //服务端地址
ServerActive=127.0.0.1        //主动向服务端发送数据
Hostname=Zabbix server        //主机名称
ControlSocket=/tmp/agent.sock        //控制套接字文件
Include=./zabbix_agent2.d/plugins.d/*.conf        //包含其他配置文件
配置开机自启动文件
vim /usr/lib/systemd/system/zabbix-agent2.service
[Unit]
Description=Zabbix Agent 2
After=syslog.target
After=network.target

[Service]
Environment="CONFFILE=/usr/local/zabbix/etc/zabbix_agent2.conf"
EnvironmentFile=-/etc/sysconfig/zabbix-agent2
Type=simple
Restart=on-failure
PIDFile=/usr/local/zabbix/logs/zabbix_agent2.pid
KillMode=control-group
ExecStart=/usr/local/zabbix/sbin/zabbix_agent2 -c $CONFFILE
ExecStop=/bin/kill -SIGTERM $MAINPID
RestartSec=10s
User=zabbix
Group=zabbix

[Install]
WantedBy=multi-user.target
启动Zabbix-agent2
systemctl daemon-reload
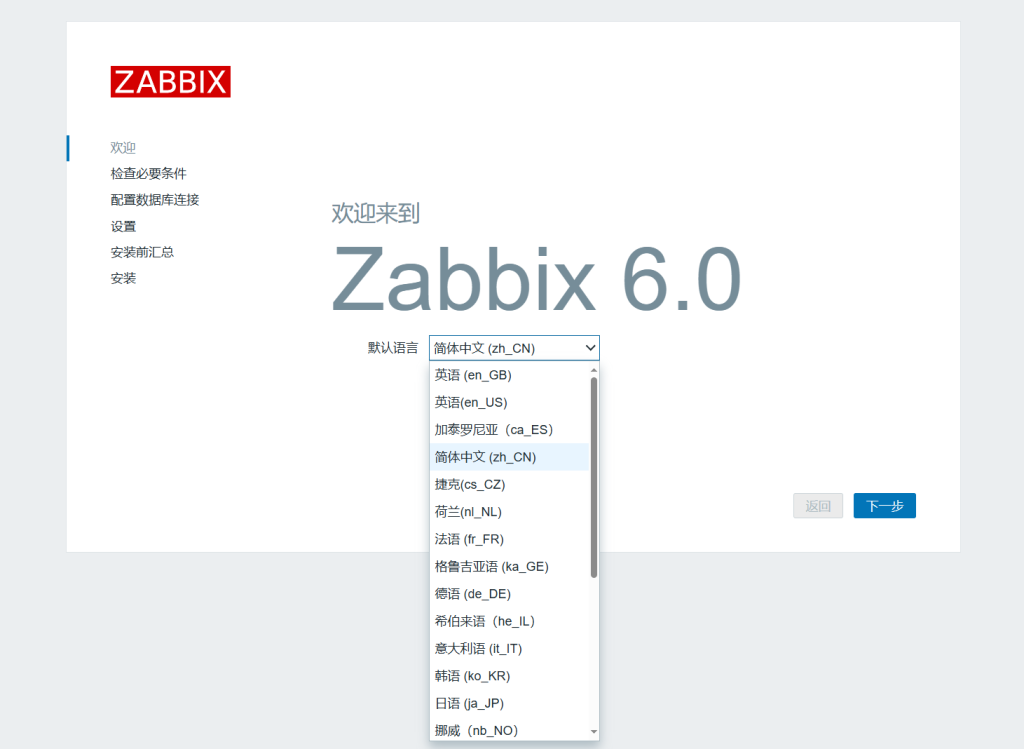
systemctl enable --now zabbix-agent2.service打开浏览器访问
选择默认语言
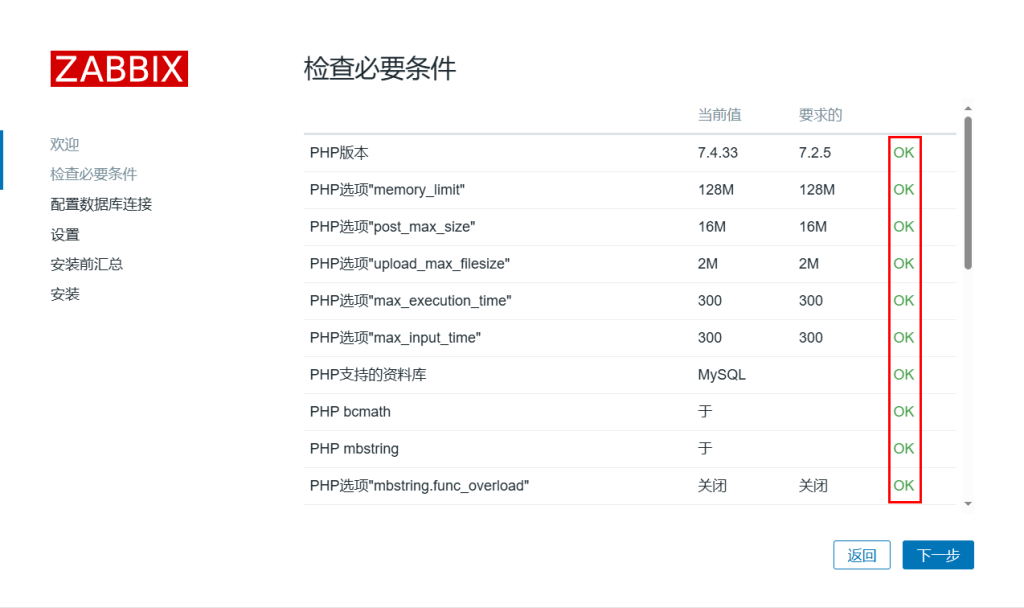
检查安装 Zabbix 所需的系统环境是否满足要求
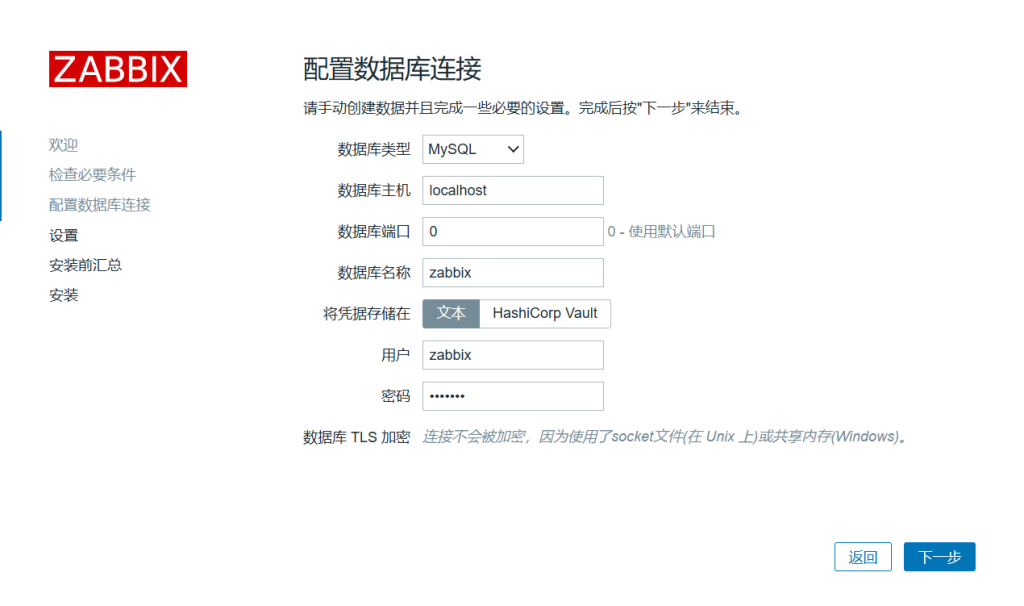
配置数据库连接
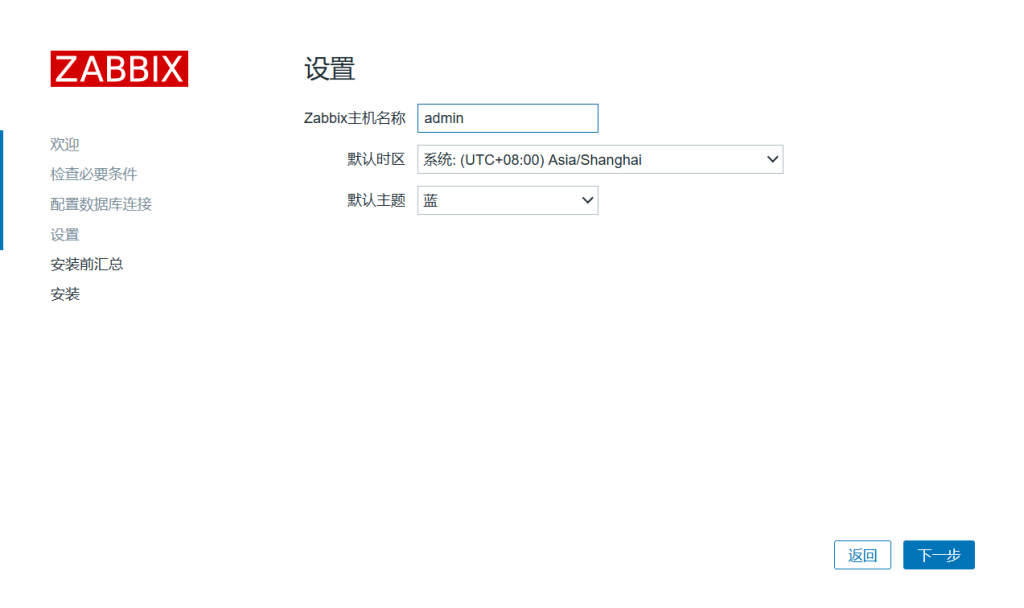
设置 Zabbix 主机名称、默认时区和默认主题
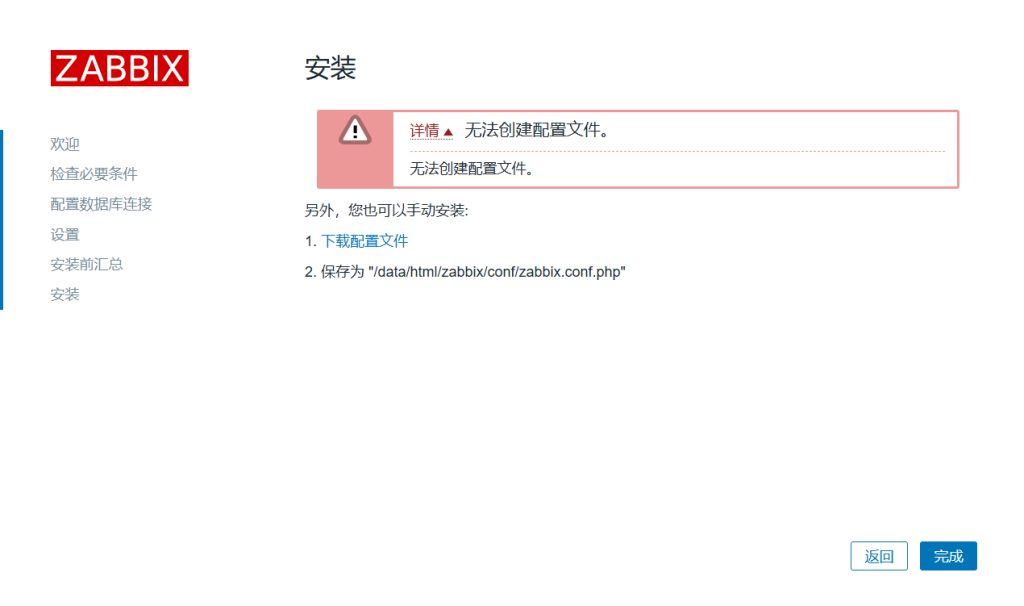
检查配置参数

下载配置文件放到/data/html/zabbix/conf/目录下
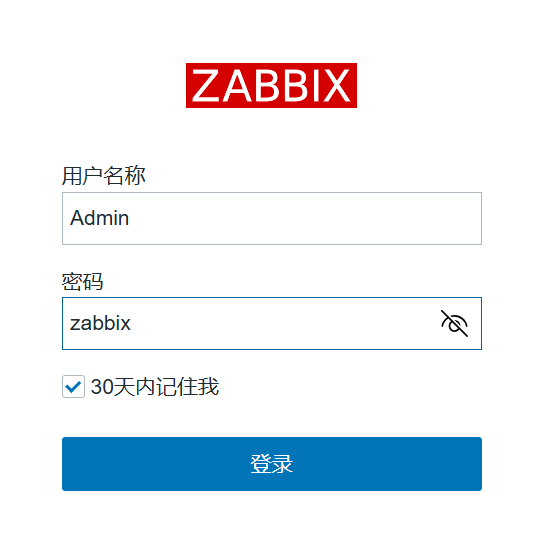
登录提示页面

登录,默认账号:Admin,密码:zabbix
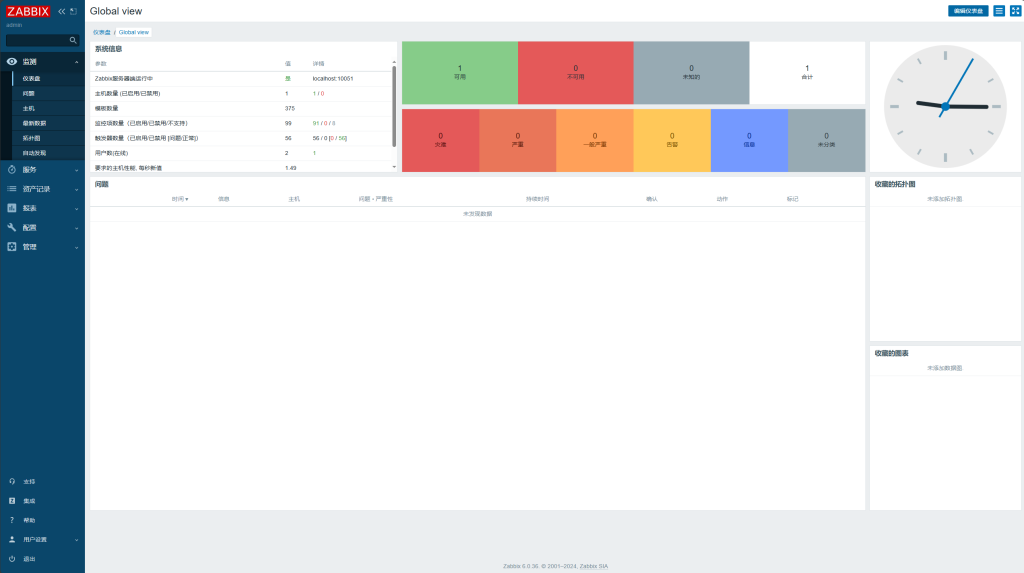
再次访问,登录
修改zabbix密码
登录Zabbix前端 > 进入用户设置页面 > 修改密码 > 保存更改 > 重新登录
解决zabbix-web中文乱码问题
yum -y install wqy-microhei-fonts
cp /usr/share/fonts/wqy-microhei/wqy-microhei.ttc /data/qm/zabbix/assets/fonts/DejaVuSans.ttf


